How to Finish 3D Printed Parts- A Study Guide
Your 3D prints may come out rough, with visible layer lines and imperfections. Without proper post-processing, your parts look unfinished and unprofessional, leading to reduced functionality and aesthetic appeal. Let’s explore the solutions.
Finishing 3D printed parts is essential for improving the appearance, strength, and functionality of prints. Methods like sanding, priming, and painting are common ways to smooth out rough surfaces and enhance the final product. Post-machining varies depending on the material, such as ABS, VeroBlack, or PLA. Each material has its unique properties and requires specific techniques to achieve the desired finish. For example, ABS may require a more aggressive sanding approach due to its hardness, while PLA might benefit from a gentler touch to avoid damaging the delicate structure.
Now that you know why post-processing is essential, let’s dive into how to properly finish 3D printed parts based on their material.
Overview of Post-machining
Post-machining involves several steps to improve the surface finish, remove imperfections, and make parts more functional or aesthetically pleasing. The most common techniques include sanding, priming, painting, and specialized treatments such as vapor smoothing or chemical polishing.
Why Do 3D Printed Parts Need Post-Machining?
3D printed parts often have visible layer lines, rough textures, and pockmarks. Without post-processing, these imperfections can affect the part’s performance, especially for moving parts or components requiring a smooth surface. Post-machining enhances both the appearance and mechanical properties of the final product.
3D Printing Finishing Options: Sanding
Sanding is one of the most widely used finishing techniques. It removes the rough edges and visible lines created during the layer-by-layer printing process. Starting with coarse sandpaper and gradually moving to finer grits helps achieve a smooth and even surface.
Sanding works well for materials like PLA and resin. Manual sanding gives more control for small details, while power sanders are useful for flat or larger surfaces. Wet sanding is recommended for resin parts to reduce dust and improve safety.
3D Printing Finishing Options: Bead Blasting
Bead blasting uses fine beads and compressed air to gently smooth the surface of a printed part. This process removes small imperfections and gives the part a soft, matte finish with a uniform texture.
It is especially effective for parts printed with nylon or powder-based technologies. Bead blasting is often used as a preparation step before painting or coating, since it helps create a surface that paint can stick to more easily.
3D Printing Finishing Options: Heat Treatments
Heat treatment is used to strengthen printed parts by reducing internal stresses and improving layer bonding. This involves heating the part to a specific temperature that is high enough to relax the material but not so high that it melts or deforms.
This method is especially helpful for parts made from high-performance materials such as nylon or reinforced thermoplastics. Careful control of time and temperature is essential to prevent warping or losing dimensional accuracy.
3D Printing Finishing Options: Priming
Priming is the first step when preparing a part for painting. It helps cover small surface flaws and provides a smooth, even base that improves paint adhesion. A properly primed surface also helps highlight any imperfections that may need further sanding.
Spray primers are easy to use and dry quickly. Applying several light coats rather than one heavy layer gives the best results. Choosing a primer that is compatible with both the printed material and the paint is important for long-lasting finishes.
3D Printing Finishing Options: Painting
Painting adds color, protection, and personality to a 3D printed part. It transforms a basic print into a polished product ready for display or functional use. You can apply paint using brushes, spray cans, or airbrush systems depending on the level of detail needed.
Before painting, it is important to sand and prime the surface to ensure smooth coverage and strong adhesion. Acrylic paints are a popular choice for most plastics, and clear topcoats can be added to improve durability and enhance shine.
3D Printing Finishing Options: Tumbling
Tumbling, also known as vibratory finishing, is a method used to polish multiple parts at once. The parts are placed into a rotating drum or vibrating container filled with abrasive media. As the container moves, the media rubs against the parts and smooths their surfaces.
This method is great for finishing many small parts quickly and consistently. It works well for batch production and is often used with materials like PLA or resin. However, it may slightly round off fine details or delicate features.
3D Printing Finishing Options: Vapor Smoothing
Vapor smoothing uses chemical vapors to melt the outer surface of a printed part slightly. This creates a smooth, glossy finish by blending the layer lines together. It also helps seal the part, making it more water-resistant and visually appealing.
This method is most effective on plastics that react well to solvents, such as ABS. Vapor smoothing should always be done in a safe, well-ventilated area, using the proper equipment to control exposure and avoid health risks.
3D Printing Finishing Options: Solvent Dipping
Solvent dipping involves quickly submerging the printed part in a chemical solution that softens its surface. This smooths out the outer layers and removes fine imperfections, resulting in a cleaner and more uniform look.
Compared to vapor smoothing, solvent dipping works faster but requires more control. Leaving the part in the solvent too long can lead to deformation. This method is mainly used with materials like ABS, and proper safety measures must be followed.
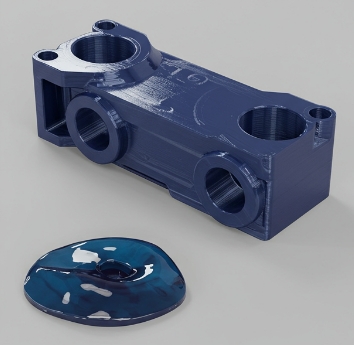
3D Printing Finishing Options: Epoxy Coating
Epoxy coating involves applying a liquid resin to the printed part’s surface. As the epoxy cures, it forms a hard, protective shell that adds strength and can give the part a glossy or polished finish. It also hides layer lines and seals porous surfaces.
This technique is especially useful for resin prints or parts that will be exposed to moisture or wear. Epoxy can be tinted or layered for added visual effects and is commonly used in art, product design, and functional prototyping.
Special Post-Machining Technology
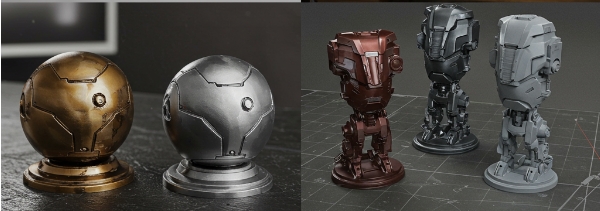
ABS steam smoothing, UV curing of resin printing, and metal electroplating are the three major post-processing technologies for optimizing 3D printed parts. ABS steam smoothing softens the plastic through steam penetration, eliminates printing marks, gives the parts a smooth appearance like injection molded parts, and may enhance their mechanical properties.
Resin printing uses UV curing technology to ensure that photosensitive resins are quickly cured and formed, and the hardness and wear resistance of the parts are significantly improved, and the texture is more delicate after post-processing. Metal electroplating adds a metallic luster to 3D printed parts, which is not only beautiful, but also gives them conductive, anti-corrosive and other properties, broadening the scope of application. These technologies work together to not only improve the appearance of 3D printed parts, but also enhance their practicality and market competitiveness, meeting diverse needs.
In conclusion
Post-machining is essential to achieving high-quality, fully functional and aesthetically pleasing 3D printed parts. Choosing the right finishing technique is critical for different materials, as each material has its own unique properties and requirements.
VMT provides one-stop services from 3D printing to post-processing, including customized post-processing solutions such as grinding and painting, to ensure that the parts meet high quality standards and meet customer needs. Choose VMT to save time and worry and create professional-grade 3D printed parts.
More resources:
How to Make Strong 3D Prints? -Source: VMTCNC
CNC vs 3D Printing: Which is Better for Your Parts Machining? -Source: VMTCNC
A Comprehensive Guide: What Materials Cannot be Used in 3D Printing? -Source: VMTCNC
Frequently Asked Questions About Finish 3D Printed Parts
How to Smooth 3D Prints Without Sanding?
For materials like ABS, you can use vapor smoothing with acetone to achieve a glossy, smooth finish without sanding. For PLA or resin prints, chemical polishing solutions are available that work similarly.
What Grit Sandpaper for 3D Prints PLA?
When sanding PLA, start with 200 grit sandpaper to remove large imperfections, then progress to 400 or 600 grit for a smooth, finished surface. Wet sanding works best for preventing material overheating.
How to Finish Off a 3D Printed Model?
To finish a 3D printed model, start by sanding the surface to remove layer lines. Apply a primer to smooth the surface and fill any remaining imperfections. Once primed, paint the model using spray paint or lacquer for a professional finish.
SHENZHEN VMT METAL PRODUCT CO., LIMITED
Latest Blogs
 Plastic Extrusion: A Complete Guide to Process, Materials, Design, and SelectionJune 18, 2026 - 9:02 am
- Acrylic vs. Polycarbonate CNC Machining: How to Choose the Right Clear PlasticJune 15, 2026 - 11:18 am
- The Ultimate Guide to Precision Acrylic CNC Machining for Industry ApplicationsJune 12, 2026 - 8:51 am
- Press Fit: A Complete Guide to Interference Fit in Precision ManufacturingJune 10, 2026 - 3:46 am
- How to Evaluate Custom Bushing Manufacturers: A Procurement GuideJune 5, 2026 - 2:55 am